Virtual Trainer Instructions
Starting an Exercise/Assessment #
When starting an exercise or assessment, the first screen that appears is the Countdown screen.

The Countdown screen provides the user with some useful information and time to prepare for the exercise:
- Current set out of the total number of sets the user will be asked to perform to finish the exercise.
- Brief graphic explanation describing the exercise loop.
- Exercise or assessment description.
Assessments #
Designed to evaluate the user’s condition, these assessments gauge the range of motion in various body parts. They instruct the user to repeat specific movements, gathering data not only for the targeted body part but also for the entire body. This comprehensive data allows therapists to identify correlations between the assessed joint or limb and movements in other areas of the user’s body.
Running an Assessment #
During the assessment, this screen is displayed as users perform the necessary motions.
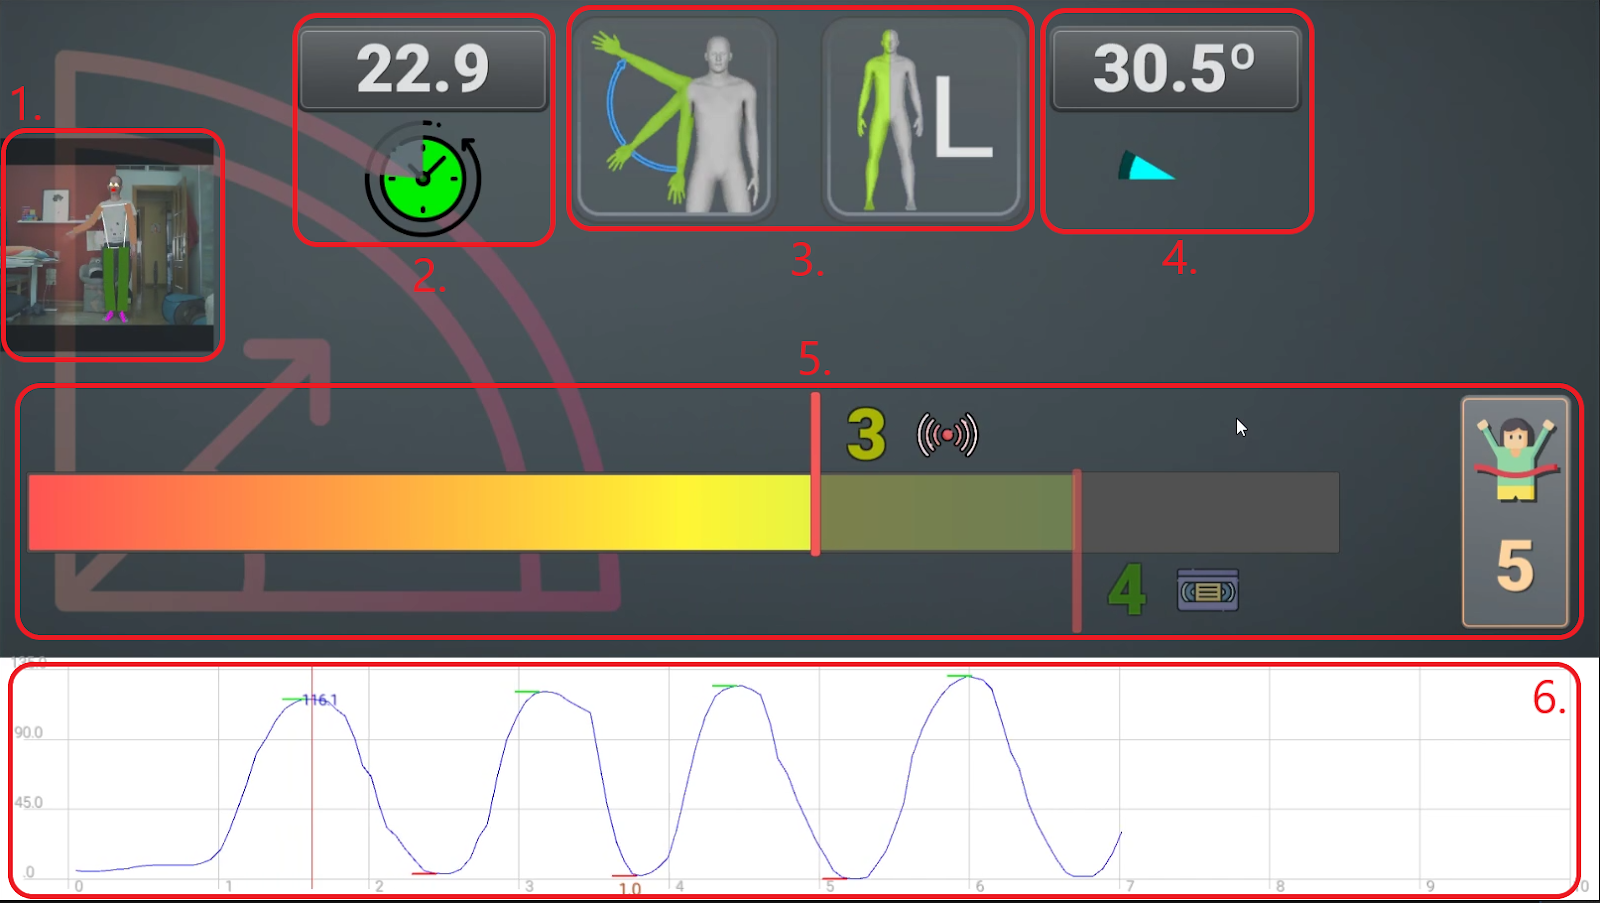
- Window showing the user and how their body is being tracked.
- Time remaining for assessment completion.
- Motion and body side required for the assessment.
- Current join angle this assessment is focusing on.
- Progress bar telling the current number of performed repetitions. There’s a secondary, grayed out progress bar showing the progression of a previous session. To the right there’s the total number of repetitions required.
- Live chart tracking the range of movement of the tracked body part.
Results #
Once the assessment is finished the user will be presented with the results screen, showing general information about the results.
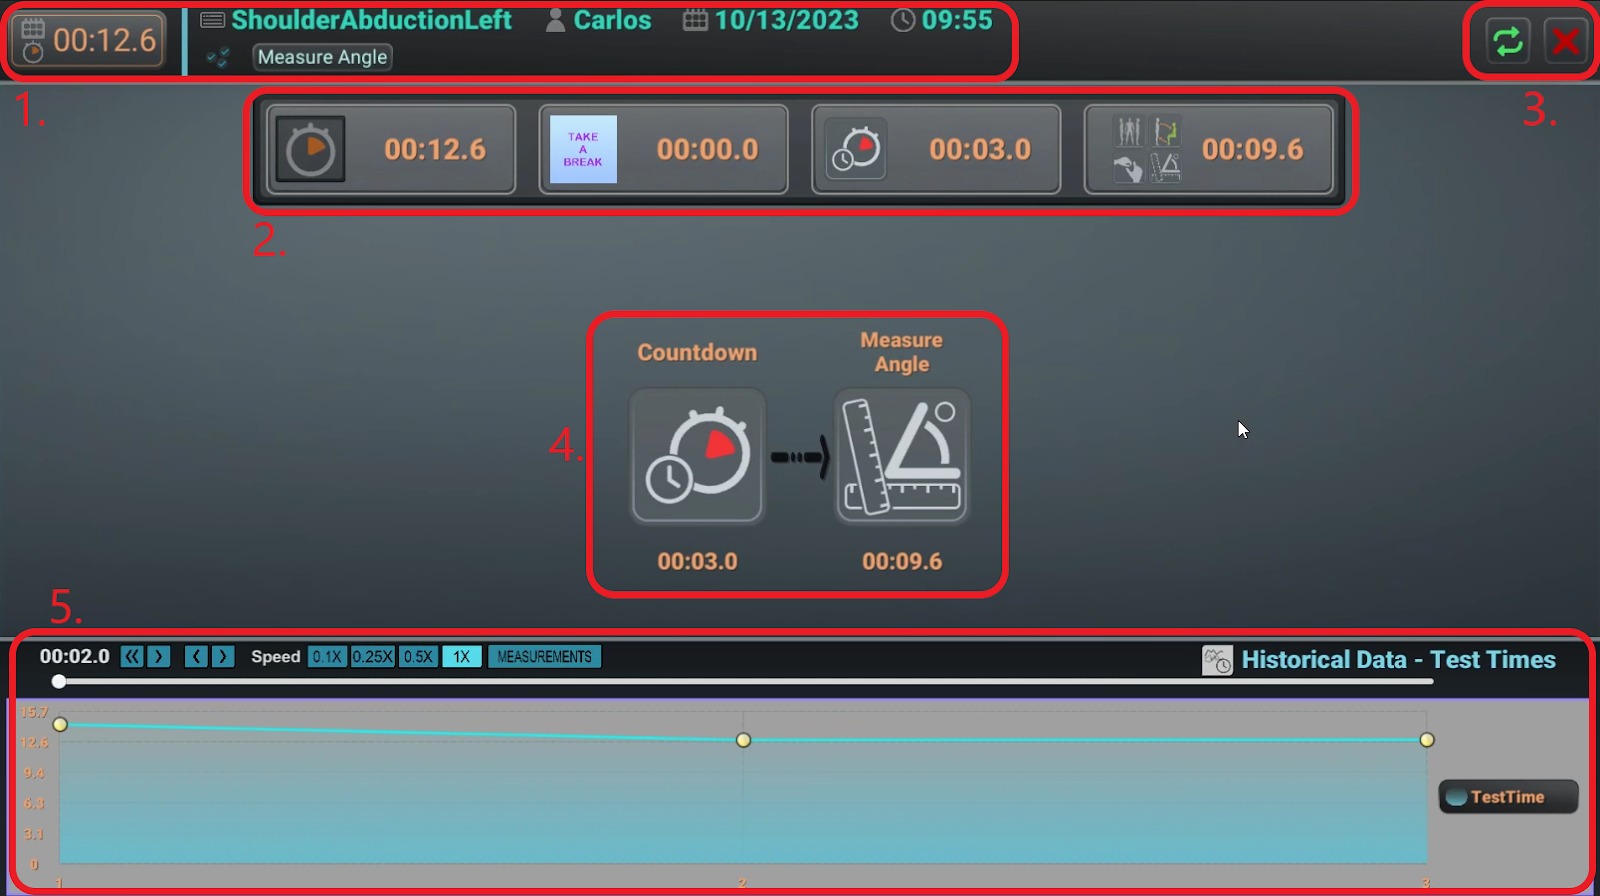
- Session data including the total time needed to complete the assessment, user and session information.
- Session time breakdown in different categories: total, breaks, countdowns and actual tasks.
- Buttons to repeat or close and save the session.
- Times per task. The user can click on the meaningful ones (in the image case, the “Measure Angle” task, which is the one tracking the shoulder abduction movement) to see a detailed results screen.
- Historical data showing the time progression for this user and assessment.
Precision Assessment #
This is a special assessment where the user is asked to “grab” objects that appear in random locations on screen. To do so the user should move the hand on top of the virtual object.
The assessment can be setup in different ways:
- Use the left hand, the right one or both.
- Make the object appear only in a specific screen location. This way therapists can focus on certain movements or avoid certain areas of the screen that would be difficult to reach, depending on the user’s physical condition.
- Total number of objects to collect and how many of them can be shown at the same time.
- How much time each object will be on screen until it disappears. This feature allows us to play with the assessment difficulty and what’s asked from the user.
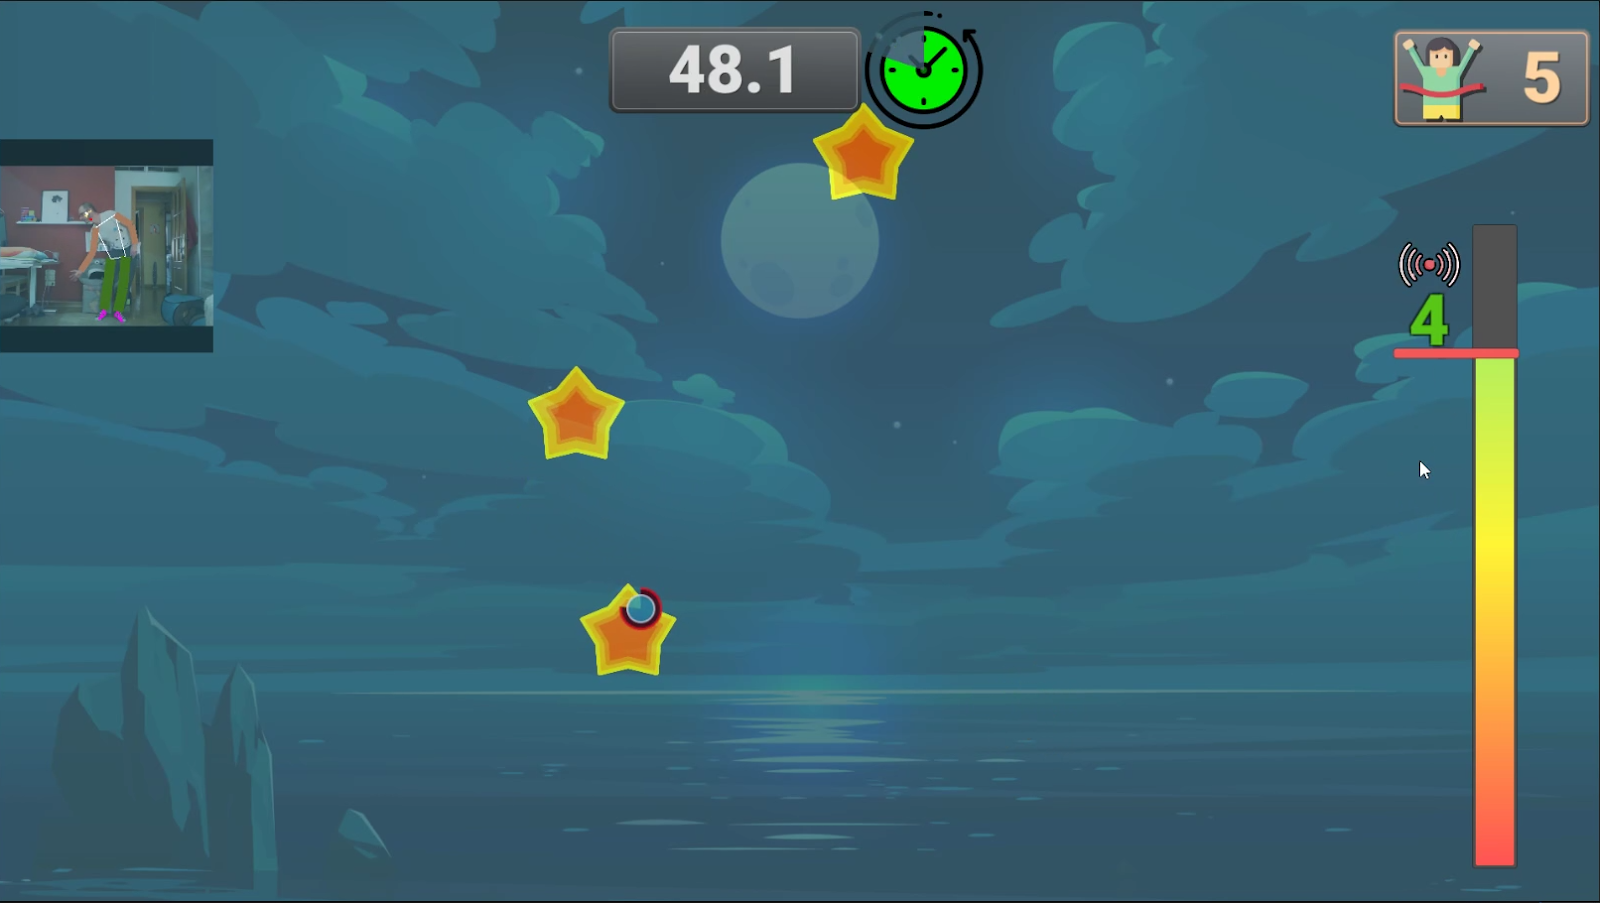
About to grab the last start before finishing the assessment
Exercises #
The goal is to make the user perform a variety of exercises while the system tracks specific body parts to ensure the exercise is being done correctly and safely too.
For this purpose a series of constraints are put in place to inform in real time what the user needs to do to correct their pose in case they’re doing something wrong but also to help them with what’s next in each exercise.
Running an Exercise #
This is the screen shown while running an exercise:
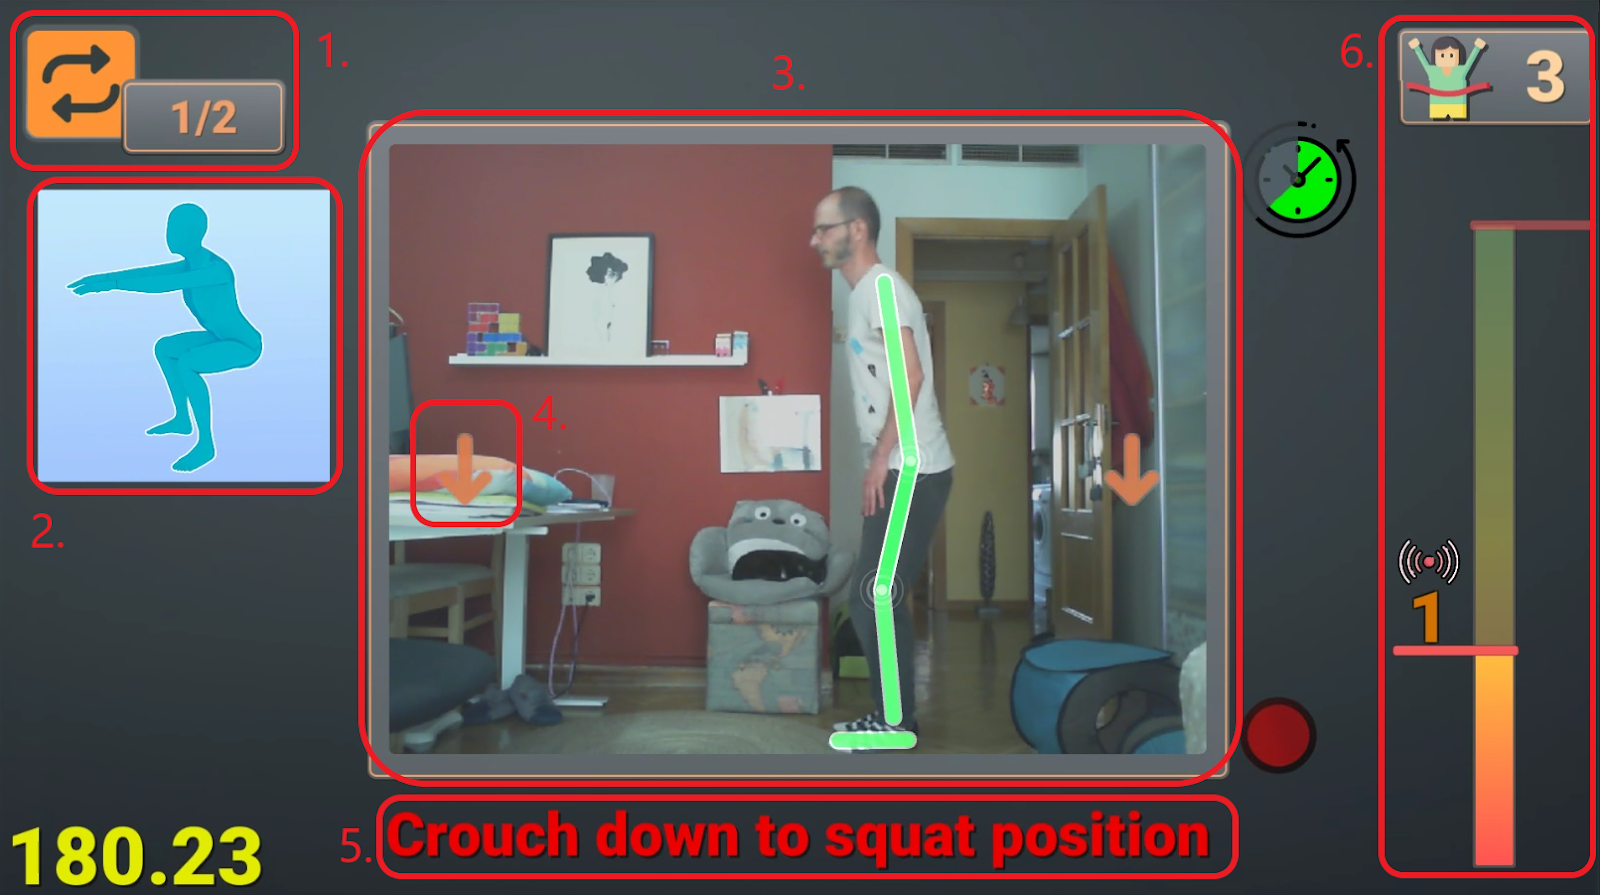
- Current and total number of sets.
- Next pose to perform.
- Overlay showing the user and giving graphical clues about the user’s performance.
- Graphical clue telling the user what to do next or what to fix.
- Text clue telling the user what to do next or what to fix.
- Progress bar showing how many repetitions belong to the current set and the current number the user has already performed correctly.
Some exercises ask the user to hold a specific pose for a certain amount of time. In those cases the user first must get into the correct pose following the virtual trainer instructions and once they’ve been able to do so, they will be shown this symbol with a timer to indicate they should hold that pose for a while.
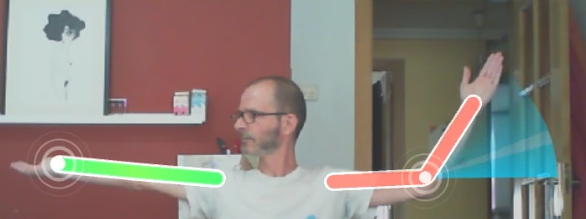
Depending on the exercise, the graphical clues will vary. In the previous screen we’ve seen arrows suggesting the user to crouch. In the next example, where the user needs to keep their elbows straight we can see a blue fan showing what the user should do with their arm. You can see how the line representing the right arm has gone red while the left one is still green. That’s another clue telling there’s something to correct with that arm. As always, this will go with a text message.
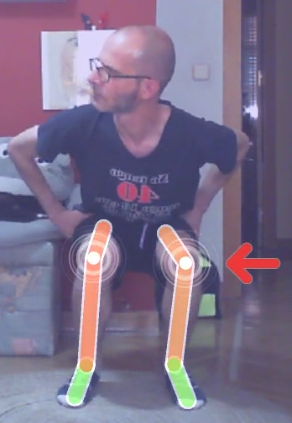
In the next one we can see how the system suggests to move that knee in the arrow direction. As stated previously, this kind of message exists not only to be sure the user performs the exercise correctly, but also to avoid hurting themselves while doing so.
Results and Scores #
Once the exercise has been completed, as much like with the assessments, a results screen will be shown.
Aside from the general data, which is the same as for assessments, the two main pieces of information here are the Performance Score and the Form Score. Both scores have a historical data chart attached so the user’s progression can be easily tracked.
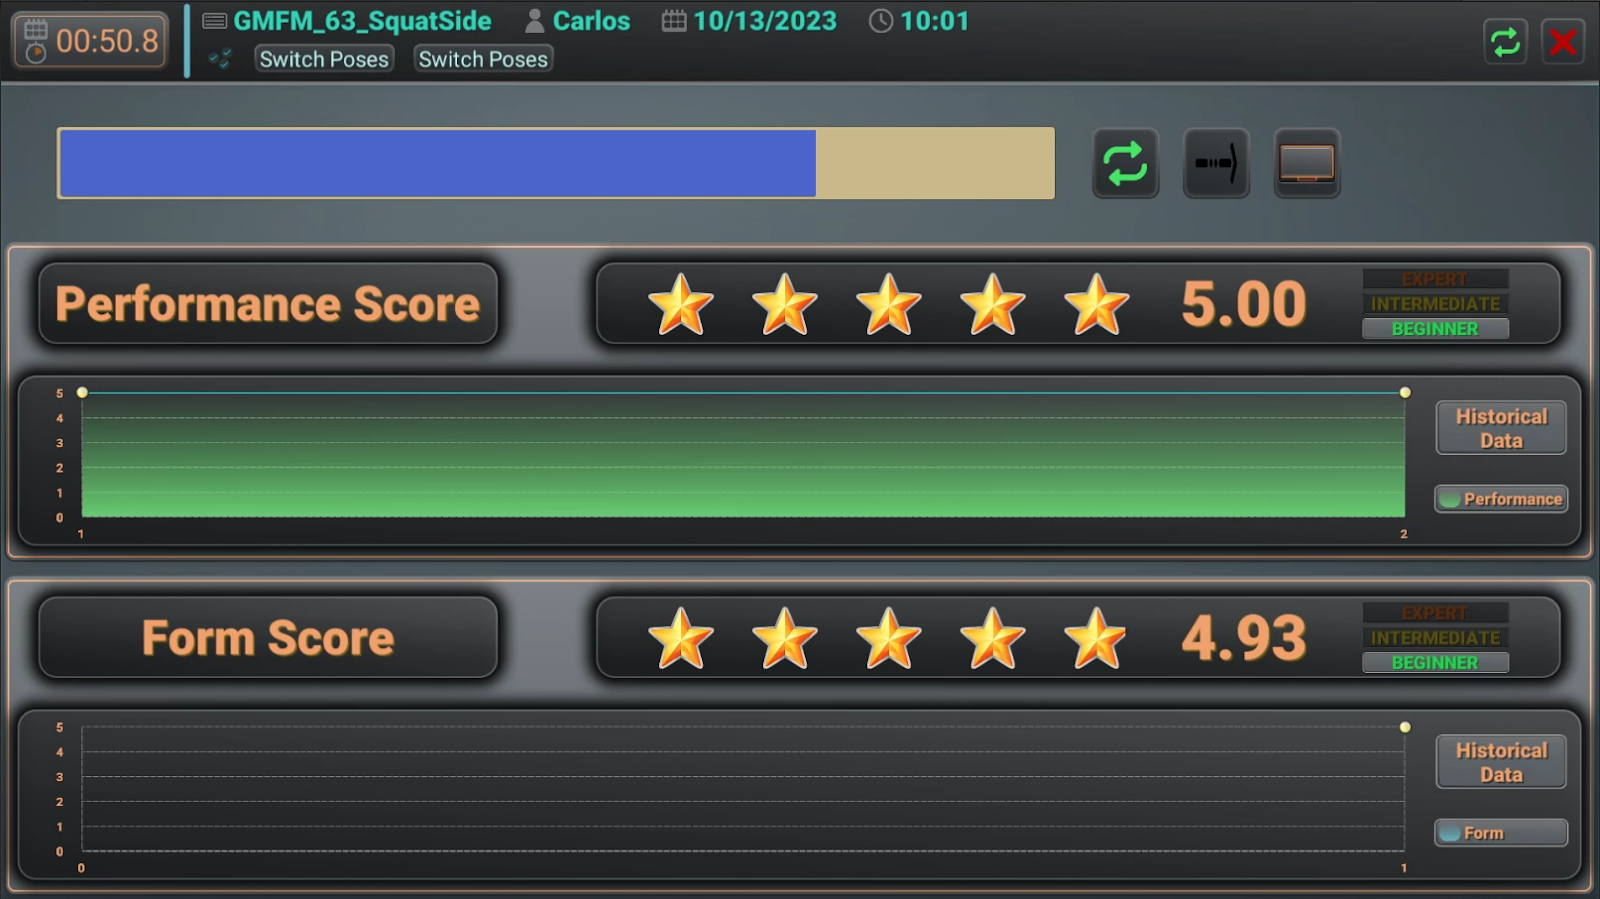
Performance Score #
A score based on how many repetitions have been successfully completed before the time ran out or the user was not able to keep going.
It means that every exercise where all the required repetitions have been completed will get a max score, while not being able to complete the first repetition will grant a zero.
Form Score #
This score measures how well the user is doing the exercise in the sense of poses correctly performed. As it was stated before, each exercise is defined by a series of rules. These rules are intended to ensure the user is actually doing the exercise and that they’re doing it in a safe way (Are they crouching for a squat? Are the knees in a position where they won’t be hurt?).
The form score will track all these rules and give a score depending on how much time they have been broken out of the total time they’ve been tracking the user while completing the exercise. Adding up all the scores for each rule, we’ll get this final one.
It’s worth noting that slightly breaking a rule grants a better score than just doing it completely wrong.